فروشگاه ناوک - آموزش و نرم افزار گرافیکی انیمیشن طراحی و معماری
ارزانترین فروشگاه ارائه دهنده محصولات گرافیکی ، آموزشی ، نرم افزار و معماریفروشگاه ناوک - آموزش و نرم افزار گرافیکی انیمیشن طراحی و معماری
ارزانترین فروشگاه ارائه دهنده محصولات گرافیکی ، آموزشی ، نرم افزار و معماریSimplyMaya - Stylized Cartoon Female - Red Girl شماره 1397
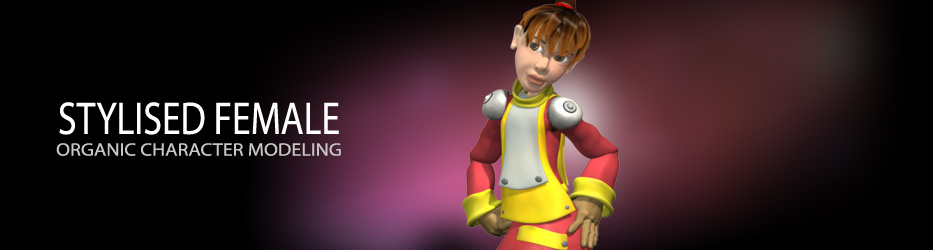
آموزش شخصیت سازی یک دخترک کارتونی در محیط مایا با نام Red Girl از شرکت Simply Maya
8 ساعت و 30 دقیقه آموزش مالتی مدیا
In this project we'll create the stylized cartoon character you can see above. The tutorial covers the complete creation of the red girl and includes the modeling, UV layout and texturing.
We start off by creating a project folder and setting up image planes before we move on to sculpting out the basic head shape with NURBS component CV's and inserting isoparms in areas that require extra resolution. We cut out holes for the eyeballs and mouth area, and convert to polygons for detail modeling and fine shaping of nostrils, chin and cheeks. We switch between a low resolution polygon and a high resolution subdivision mesh and use the sculpt geometry tool to smooth and round out areas of the model to get a nice organic shape.
قیمت : قیمت کلیه محصولات را می توانید در فایل اکسل ( قابل دانلود ) ملاحظه نمائید
( محصول شماره 1397 )
SimplyMaya - Apache Tutorial: The Complete Apache Helicopter Pro
یک آموزش بسیار جذاب و دیدنی در محیط مایا از شرکت SimplyMaya شامل مباحث زیر :
- Simply Maya - Apache Helecopter - Modeling : آموزش ساخت یک هلی کپتر طبیعی و جنگی که شامل قسمت اصلحه و تجهیزات و موشک - درهای بازشو از بالا - داخل رول هلی کپتر و ... در این عنوان حرفه ای قرار دارد .
- Simply Maya - Apache Helecopter -Texturing : بافت زدن و تکتچرینگ مدل هلی کپتر در فتوشاپ و مایا و نورپردازی برای ساخت صحنه - کامپوزیت تصویر و ... در این عنوان قرار دارد .
- Simply Maya - Apache Helecopter - Animating : در این آموزش نیز شما انیمیت هلی کپتر و صحنه های پرواز - پرتاب موشک و ... مانند یک پروژه کامل عمل خواهید کرد .
بیش از 26 ساعت آموزش مولتی مدیا !!
برای مطالعه ریز جزئیات این آموزش ادامه مطلب را مطالعه بفرمائید .
قیمت : قیمت کلیه محصولات را می توانید در فایل اکسل ( قابل دانلود ) ملاحظه نمائید
( محصول شماره 1396 )

SimplyMaya - Ferrari - Remastered شماره 1395
آموزش طراحی و ساخت مدل یک خودرو شیلک فراری با جزئیات کامل در محیط نرم افزار مایا از شرکت Simply Maya .
بیش از 13 ساعت آموزش چندرسانه ای
قابل ذکر است اصل این آموزش در 4 دی وی دی بوده که بدون کاهش در کیفیت تصاویر و فیلمهای آموزشی آنرا در 2 دی وی دی گنجانده ایم .
Create the Ferrari from start to finish in this 13 hour long tutorial. The car is made with poly's then converted to sub d's, it also walks you through setting up materials in hypershade and texturing in Photoshop. This tutorial also covers some simple uv tools.
قیمت : قیمت کلیه محصولات را می توانید در فایل اکسل ( قابل دانلود ) ملاحظه نمائید
( محصول شماره 1395 )
SimplyMaya - Car Modeling (BMW) شماره ۱۳۹۴
بیش از ۱۰ ساعت آموزش مدلسازی و تکستچرینگ یک مدل ماشین BMW که امیدواریم از دیدن آن لذت ببرید . این آموزش در محیط مایا توسط شرکت SimplyMaya تهیه شده است .
This tutorial is meant for intermediate to advanced users who have an understanding of the Maya interface and tools. We will start off the car by setting up image planes of top, side, front and back views to aid us in seeing the correct shape of the car from all angles. Once the image planes are up we will start modeling using a variety of different modeling methods including nurbs curves, nurbs primatives as well as polygons to achieve the basic shape of the car.
Then we'll combine and edit the geometry to refine our shape and start adding details where lights are found for the contours of the body. Some of the tools we will be using are split polygon, cut face tools. as well as extrude face and edge tools. When the modeling of the car is complete we will begin setting it up for texturing. We'll cover the UV editor and how to lay flat UV's of your geometry using the tool set found in the editor. We will then take a snapshot of the UV's and import them into a paint program where you will learn how to add color using layers as well as the basic techniques of adding stripes of color to your car if you wanted to do so in the future.
Once we have color on our car we will dive into lights and material editing so that we can start getting a nice realistic look and feel. You will learn how to adjust settings on your paint color material to get different effects as well as how to adjust your lights in many different ways to enhance your color by adding highlights and reflections. The last part covers how to do your final renders..
قیمت : قیمت کلیه محصولات را می توانید در فایل اکسل ( قابل دانلود ) ملاحظه نمائید
( محصول شماره 1394 )

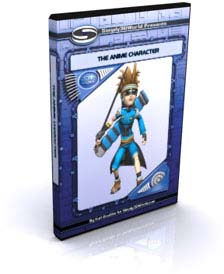
SimplyMaya - The Anime Character شماره 1393
آموزش طراحی و کارکتر سازی یک شخصیت خاص کارتونی در محیط مایا از شرکت Simply Maya .
حدود 9 ساعت آموزش جامع مالتی مدی
This tutorial is geared for intermediate Maya users. If you're into anime characters then this tutorial is right up your alley. We will start off this tutorial by using just a concept sketch to model the character unlike other tutorials which used a side and front view. This will encourage you to rely on your visual and artistic skills to complete the shape of the model.
The modeling techniques used will be shaping in nurbs, converting to polygons to add details and then into sub'ds to define the final shapes. Some of the tools covered in the modeling sections are split polygon tool, cut face tool and sculpt surfaces tool, just to name a few.
Once the modeling of our new character is complete we move toward preparing our model for texturing. We do this by laying out the Uv's for all the separate parts of the body to make them flat so we can get a nice clean UV snap shot for our painted textures. Tools covered in the layout section include planar map, cylindrical map, and automatic map, as well as move and sew uv's. After the Uv's are finished and your snap shot is taken we jump into a paint program to start adding color and texture to our model.
قیمت : قیمت کلیه محصولات را می توانید در فایل اکسل ( قابل دانلود ) ملاحظه نمائید
( محصول شماره ۱۳۹۳ )
SimplyMaya - Pilot Girl Repack شماره 1392
موزش مدلسازی یک دختر خلبان در محیط مایا توسط شرکت SimplyMaya
بیش از 7 ساعت آموزش مولتی مدیا
Learn how to build the female character from start to finish. The tutorial goes from the very start where we set up the image planes - the move on to the nurbs section of the modeling. We will then rough out the shape before moving onto polygons and then sub division modeling to really bring out the detail.
قیمت : قیمت کلیه محصولات را می توانید در فایل اکسل ( قابل دانلود ) ملاحظه نمائید
( محصول شماره 1392 )

SimplyMaya - Ninja Warrior modeling شماره 1391
آموزش طراحی و ساخت مدل یک جنگجوی نینجا با جزئیات کامل در محیط مایا از شرکت Simply Maya .
حدود 7 ساعت 15 دقیقه آموزش چند رسانه ای
Have you always liked mystical creatures? The centaur tutorial covers all the aspects of modeling a realistic looking creature from start to finish. The tutorial is great for intermediate to advanced users and covers modeling the head, eyes, mouth, body and even his armour. It also shows how to build and maintain proper topology of your models geometry.
You will begin this tutorial by setting up Image planes to aid you in creating the correct size and proportion of the model in nurbs. Once you have roughed out the size of your creature you will dive into the world of converting geometry from nurbs to polygons and then polygons to sub-ds, as well as adding detail using many different modeling tools to achieve a very realistic look. This tutorial will definatly give you a good understanding of how to start creating your own high res models.
قیمت : قیمت کلیه محصولات را می توانید در فایل اکسل ( قابل دانلود ) ملاحظه نمائید
( محصول شماره ۱۳۹۱ )
نحوه خرید از فروشگاه و دریافت لیست آخرین بروز رسانی
SimplyMaya - Centaur Modeling - High Poly شماره 1390
آموزش خلق یک موجود افسانه ای - اسطوری ای با نام سنتار، که نیمچهار پا و نیم انسان است در محیط مایا از شرکت Simply Maya .
8 ساعت و 20 دقیقه آموزش چندرسانه ای
این آموزش که یکی از زیباترین آموزشهای شرکت SimplyMaya محسوب می شود دارای جذابیت خاصی است که هر هنرمندی را مجذوب خود می کند . امیدواریم با دیدن این آموزشهای خلاقیت خود را چند برابر کنید . این آموزش بصورت اتوران و در 3 عدد دی وی دی عرضه می شود .
قیمت : قیمت کلیه محصولات را می توانید در فایل اکسل ( قابل دانلود ) ملاحظه نمائید
( محصول شماره 1390 )

SimplyMaya - Yamaha Superbike - By Peri شماره 1389
آموزش مدل سازی و خلق یک موتور یاماها در محیط نرم افزار مایا از شرکت Simply Maya .
بیش از 10 ساعت و نیم آموزش چند رسانه ای
Kurt takes us though modelling the Yamaha R1 from image plan set up right to detailing. The tut covers techniques using nurbs to get basic shape coveting to polys then sud-ds.
قیمت : قیمت کلیه محصولات را می توانید در فایل اکسل ( قابل دانلود ) ملاحظه نمائید
( محصول شماره ۱۳۸۹ )
SimplyMaya - The Pirate Ship شماره ۱۳۸۸
آموزش ساخت یک کشتی بادبانی بزرگ بسیار زیبا در مایا توسط شرکت SimplyMaya
بیش از 15 ساعت آموزش مولتی مدیا
You will start off the pirate ship project by creating Image planes to use as reference to achieve the basic shape and size of our ship using nurbs primitives and nurbs curves. Once we have our ship blocked out we will begin converting into polygons to start adding details to the wood on the side of the ship. We�ll be using a variety of tools and techniques such as split polygon tool, 'move vertices' as well as 'convert to Subdivisions'to have a bit more control over shaping the geometry. We will also do more nurbs curve work to create ropes that hang down from the sails. After are ship model is complete the tutorial switches to preparing the model for texturing.
We will then enter the world of UV layouts and will be using a few different options to achieve this called such as automatic map'and planar map', as well as learn how to effectively move any UVs that are overlapped using the tools in the UV editor to obtain a flat map. Once our UV's are finished and we've taken a UV snap shot we then import our snapshot into a paint program and learn how to color and hand paint the ships'surface.
Areas covered in the paint section are using layers, staining of the surfaces, as well as use of a few filters. Once we have our colors complete its off to create our bump and secular maps which creates depth to surface flaws such as cracks and adds a more realistic look.
قیمت : قیمت کلیه محصولات را می توانید در فایل اکسل ( قابل دانلود ) ملاحظه نمائید
( محصول شماره ۱۳۸۸ )