فروشگاه ناوک - آموزش و نرم افزار گرافیکی انیمیشن طراحی و معماری
ارزانترین فروشگاه ارائه دهنده محصولات گرافیکی ، آموزشی ، نرم افزار و معماریفروشگاه ناوک - آموزش و نرم افزار گرافیکی انیمیشن طراحی و معماری
ارزانترین فروشگاه ارائه دهنده محصولات گرافیکی ، آموزشی ، نرم افزار و معمارینظرسنجی
روزانهها
همه- فروشگاه بزرگ ناوک گرافیک بزرگترین و ارزانترین فروشگاه محصولات گرافیک و انیمیشن
پیوندها
دستهها
- آموزش Maya 538
- آموزش 3DSMax 375
- آموزش Photoshop 299
- آموزش Zbrush 171
- آموزش Premire 17
- آموزش After Effect 128
- آموزش softimage XSI 81
- آموزش VUE 35
- آموزش Fusion 18
- آموزش Loxology Modo 36
- آموزش Mudbox 25
- آموزش Apple Shake 7
- آموزش Houdini 39
- آموزش Flash 18
- آموزش Lightwave 3D 17
- آموزش Cinema 4D 76
- آموزش جلوه های ویژه Master Class 2
- آموزش AutoCad 26
- آموزش RealFlow 26
- مجله ویدئویی stash media 74
- 3d Models and Textures 301
- آ موزش corel painter 3
- آموزش Illustrator 17
- آموزش Blender 16
- آموزش Stitcher 1
- آموزشهای دیگر 188
- آموزش Archicad 3
- آموزش زبان 34
- نرم افزار 246
- آموزش مایکروسافت 51
- BodyPaint 3D 8
- آموزش Web 31
- آموزش CorelDraw 4
- معماری 21
- آموزش Indesign 4
- آموزش 3D Coat 2
- آموزش SolidWorks 3
- جلوه های ویژه FXPHD 4
- آموزش Foundry Mari 14
- آموزش UDK 21
- آموزش Massive 3
- آموزش Unity3D 36
- آموزش NUKE 43
- آموزش MotionBuilder 7
- آموزش Boujou 2
- محصولات Digital Juice 48
- آموزش Mocha 4
- آموزش SILO 2
- آموزش Sculptris Alpha 2
- آموزش Studio Tools 2
- آموزش Cryengine 6
- آموزش Pftrack 3
- آموزش SynthEyes 3
- آموزش CityEngine 1
- آموزش Poser 2
- آموزش Lightroom 2
- آموزش Pro/ENGINEER 1
- مجله گرافیک و معماری 6
- آموزش Rhino 3D 5
- آموزش NAIAD 2
- آموزش AVID 3
- آموزش Smoke 1
- آموزش headus UVLayout 1
- آموزش Scratch 2
- آموزش TopoGun 1
- آموزش Pinnacle Studio 1
- آموزش Google SketchUp 2
- آموزش فیلم سازی 1
- آموزش EDIUS 1
- آموزش SpeedGrade 2
- نحوه خرید از فروشگاه ناوک 1
ابر برجسب
وی ری مدلهای سه بعدی مایا انیمیشن تجارت با ایمیل تجارت الکترونیکی زیبراش مدلسازی خودرو افتر افکتز کوزه تری دی مکس بیلیارد وسایل ورزشی ارزانترین نرم افزارجدیدترین یادداشتها
همه- لیست جدید محصولات مورخ 1395/12/06
- بروزرسانی محصولات ( 9962 محصول ) در مورخه جمعه 1395/07/09( لطفا لیست جدید را دانلود نمائید )
- Lynda.com - Drupal 7 Essential Training Full شماره 3192
- Lynda.com - PayPal Essential Training Full شماره 3191
- Lynda.com - Illustrator CS6 One-on-One Fundamentals شماره 3190
- Lynda.com - Trapcode Particular Essential Training شماره 3189
- Digital Tutors - Character Animation Setup In XSI شماره 3188
- Allegorithmic Substance Designer 3.1.0 Build 10337 MacOS شماره 3187
- Allegorithmic Substance Designer 3.1.0 Build 10337 Win64 شماره 3186
- Microsoft Office Professional Plus 2013 Beta x64 شماره 3185
- Microsoft Office Professional Plus 2013 Beta x86 شماره 3184
- Lynda.com - XML Essential Training شماره 3183
- Lynda.com - SQL Server 2008 Essential Training شماره 3182
- Lynda.com - Photoshop Elements 10 Essential Training شماره 3181
- Lynda.com - Real World XML Full شماره 3180
بایگانی
- اسفند 1395 1
- اردیبهشت 1395 1
- اسفند 1392 5
- آذر 1392 24
- فروردین 1392 4
- آذر 1391 3
- آبان 1391 63
- مهر 1391 220
- شهریور 1391 133
- مرداد 1391 135
- تیر 1391 65
- خرداد 1391 55
- اردیبهشت 1391 91
- فروردین 1391 76
- اسفند 1390 63
- بهمن 1390 72
- دی 1390 72
- آذر 1390 70
- آبان 1390 93
- مهر 1390 134
- شهریور 1390 25
- مرداد 1390 95
- تیر 1390 87
- خرداد 1390 106
- اردیبهشت 1390 56
- فروردین 1390 327
- اسفند 1389 261
- بهمن 1389 210
- دی 1389 78
- آبان 1389 43
- مهر 1389 386
- شهریور 1389 132
تقویم
اسفند 1395| ش | ی | د | س | چ | پ | ج |
| 1 | 2 | 3 | 4 | 5 | 6 | |
| 7 | 8 | 9 | 10 | 11 | 12 | 13 |
| 14 | 15 | 16 | 17 | 18 | 19 | 20 |
| 21 | 22 | 23 | 24 | 25 | 26 | 27 |
| 28 | 29 | 30 |
جستجو
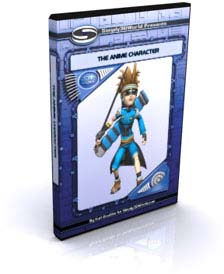
SimplyMaya - The Anime Character شماره 1393
آموزش طراحی و کارکتر سازی یک شخصیت خاص کارتونی در محیط مایا از شرکت Simply Maya .
حدود 9 ساعت آموزش جامع مالتی مدی
This tutorial is geared for intermediate Maya users. If you're into anime characters then this tutorial is right up your alley. We will start off this tutorial by using just a concept sketch to model the character unlike other tutorials which used a side and front view. This will encourage you to rely on your visual and artistic skills to complete the shape of the model.
The modeling techniques used will be shaping in nurbs, converting to polygons to add details and then into sub'ds to define the final shapes. Some of the tools covered in the modeling sections are split polygon tool, cut face tool and sculpt surfaces tool, just to name a few.
Once the modeling of our new character is complete we move toward preparing our model for texturing. We do this by laying out the Uv's for all the separate parts of the body to make them flat so we can get a nice clean UV snap shot for our painted textures. Tools covered in the layout section include planar map, cylindrical map, and automatic map, as well as move and sew uv's. After the Uv's are finished and your snap shot is taken we jump into a paint program to start adding color and texture to our model.
قیمت : قیمت کلیه محصولات را می توانید در فایل اکسل ( قابل دانلود ) ملاحظه نمائید
( محصول شماره ۱۳۹۳ )